Translate

Saturday, December 16, 2017

Whores And Saints: The Village People

Some of my favorite figures to paint are the less important types. Civilians, animals and wagons can add flavor to the game table. If you're willing to use your imagination a bit, worked into your scenarios in some way. If you're doing a game for a convention then you've probably considered specially made terrain to be noticed for some award or attracting players. As seen elsewhere on my blog, I have the villages just not much in the way of inhabitants.

Battle Front has a set of villagers that have caught my eye. Though they are of a more recent vintage than the Napoleonic wars, they are the closest figures I can find.

The nuns were an interesting figure choice for the set and suitable. Unfortunately the Battle Front package had some duplicates that probably could have at least had some different poses. The little vignettes add character to a game table.

The one figure in this set that was completely wrong and stood out was the policeman waving his finger. For the 20th century, it would be well suited but not early 19th century. So I thought maybe it could be converted but then realized it was not possible. So I clipped him from his little stand and in his place, glued a spare Napoleonic figure in his place. I had two of these guard chasseurs holding a bicorn and wearing a colpack. This Old Glory figure was from the set with Napoleon and his headquarters set. So I chopped his head off and then replaced it with that of a useless Marshal Brune figure that had a bare head. Now the figure appears to be a high ranking cavalry officer looking for female companionship.

My monastery lacked monks for a long time and so I purchased the praying monks figures made by Essex. There were 6 figures with there being three sets of duplicates. I used 5 of the figures here and did them in the traditional dull brown robes.

Not a lot of use for such figures but they were a great break from all the serious painting I've done throughout the year.

Saturday, December 9, 2017

Review: Eagles Over Bavaria & Duel Of The Princes

A while back I announced the upcoming release of two new scenario books from the talented historical researcher Michael Hopper. Having played many scenarios that he has written, I knew these books would be accurate and detailed to the level any fan would demand. Having now purchased and reviewed them, I can say they do not disappoint.

The old saying of not judging a book by its cover may be true, but in this situation the cover artwork is beautiful. Keith Rocco's works were used and offer a unique and meaningful presentation for these book covers. Classic paintings could have been used and might have well sufficed, but Michael Hopper chose to not cut any corners in this area. The glossy and eye catching cover was a great choice.

The beginning of the scenario book has some map keys and unit totals for the historical scenarios. These battles are quite manageable for 2-4 players with average sized collections. Larger battles like Eggmuhl, has a northern and southern scenario for fighting a portion of the battle. Abensburg has northern, center and southern scenarios for those portions of the battle. For rule sets like Lasalle where the general idea is that you're fighting a portion of a larger battle, this fits nicely. For Shako players, playing a large battle may be possible but be limited not by the rules, but by the game space available or number of players.

Of the two, Eagles Over Bavaria was the book I was looking forward to more so. Since I have a good number of Bavarian troops that sort of sit around in reserve status, it is nice to have some scenarios for me to structure an Austrian army around. Altdorf is one of those smaller battles that would be easier for player to recreate and offer some challenges for maneuvering. This particular scenario is one that I will work to get Austrians to be able to refight.

Duel Of The Princes has the same easy to follow lay out and scenario details. One detail that players may pick up on that weren't always available with other scenario books is that details of unit strength and artillery battery compositions. A 6lb gun might be rated differently depending on which rule set you're using. Knowing if a French foot battery was composed of 6lb or 8lb guns might impact whether the guns are deemed light or medium. Those details matter and Michael Hopper delivers. The morale and training ratings are listed for units in the order of battle. Different rule sets approach this information with varying levels of consideration, but having it will let you decide how to apply it.

Many scenario books are written to promote a particular set of rules and players are forced comply or spend time translating information into a different set of rules. These scenario books are specific on details for the scenarios but open enough to be applied to the rules of your choice. These scenario books are being printed in a limited run and so if you want to obtain your copy, you can contact Michael Hopper at log1cal.mh@gmail.com

Wednesday, October 11, 2017

Massena At Wagram

A couple of summers back, while browsing for 15mm wagons and carts on eBay, I came across this set. The set appeared to have only two limber horses, the postillion and Massena with his arm in a sling. No coachman or other horses? I knew of the set's mythical existence and had inquired some time ago and discovered that the mould had been damaged beyond repair during the transition from one owner to another. These little vignette pieces are genuine treasures and I had only ever seen one other in existence.

It isn't as if the Danube Campaign is of any great interest of mine, it is just the collector side of me wanting to add it to my collection. After all, I've got pontoon wagons, wagons full of fodder and lumber, why not a nice carriage model? On the Blog of Phil from Association - Les Riflemen, an Essex brand carriage can be seen. It is nice, impractical - but nice. And impractical is why this has sat unpainted in a box for a couple of years.

Well impractical and what color is it supposed to be? There aren't many sources available and the images agree on basic design but not on color. Either something close to white or possibly black. An image search for this type of caleche carriage appears more often black than white, but these are modern images. Had it been some unusual color, it would seem someone would have noted this. So this leaves me with either a white or black decision.

I decided to order other figures to complete the set as to how it historically appeared. There is no way for me to know if the original Old Glory model had four horses and a coachman, but the real carriage did. There isn't a great deal of information written about Massena's carriage, but from what there is I will have to make do. My quest for a proper coachman lead me to consider either ordering some other carriage model and rob the figure from that set or convert something. Alternative Armies makes a 15mm range known as Brickdust. Oddly enough, they happen to have a package of 8 identical seated wagon drivers/coachmen. Who knows what the motivation was for such a casting by itself, but it fills a need. Did Massena's coachman wear a bicorn or a type of top hat? Again, no information available. Since he is a civilian, I'll settle for the top hat.

From the Napoleon Series:

There is anyhow fairly certain that the decisions were taken within the innermost circle (i.e. circle, a strict figurative meaning for party, group) of the subordinates, consequentially from the entourage militaire (i.e. accompanying military suite) of his Staff. The prevailing solution in place of consultation – both medical, and military – was therefore not to leave the line of duty, but to remain as an exampled devotion in the operative theatre, making himself available, utilizing different means of transport.

This sound decision excluded for Masséna the free mobility of walking on foot, as well as horseback-riding; it consequently led to an expedient way out of this situation – certainly significant, and quickly pondering the necessary and demanding military tasks. To take over all the adversities and Masséna’s psychological state of passivity, the selected vehicle of locomotion was a wooden carriage.[6]

"In the first instance artillery horses were to be harnessed to the carriage it was found that they were too long for the pole and not easy enough in their action, so four horses from the marshal’s stable were substituted.

Two soldiers from the transport were to drive, and they were just getting into the saddle on the evening of July 4, when the marshal’s own coachman and postilion declared that as he was using his own horses it was their business to drive. No representation of the danger into which they were running could deter them from their purpose; the coachman got on the box and the postilion mounted just as if they were going for a drive in the Bois de Boulogne".

The last issue was the horse team. I have the two standard limber horses, which I know was the original idea to pull the carriage but were swapped out for four white horses from Massena's stable. I have additional limber horses to spare, but they're not entirely correct as these animals were said to have been too long for the pole/shaft and thus why they were swapped out. Why cut a corner now? No one would likely know, but it shouldn't be hard to find suitable horses without the army harnesses and that are a little smaller. Blue Moon Manufacturing produces a package of wagon horses which are better suited than any other brand I could find. So size and harnessing appears to be a perfect fit for what I'm looking for.

The Napoleon Series also provided some details that I've considered:
Under this precise definition of wheeled transport the reader would be prone to understand that a carrosse (horse-drawn vehicle), a calèche (calash), but not a berline. The correct interpretation leads more properly to the calèche.

On this theme, Paulin, one French officer of the génie and aide-de-camp to Général Henri-Gatien comte Bertrand, presents exhaustive elucidations.

"A midi, rien ne paraissait se décider encore; de grands mouvements s’ opéraient de part et d’ autre. On voyait le maréchal Masséna, rappelant […] Maurice de Saxe à Fontenoy, parcourir les rangs de ses divisions et leur imprimer sa bouillante ardeur, porté dans une calèche que ses chevaux conduisaient partout où le danger réclamait la présence d’un chef".

Trslt.: Wagram - "At midday, nothing seemed yet to be decided; some great movements were carried out from one side and the other. One could see the Marshal Masséna, recalling […] Maurice de Saxe at Fontenoy, traversing the ranks of his divisions and leaving to them the imprint of his hot ardour, brought by a calash that his horses led everywhere where the danger asked for the presence of a leader".


My photography skills may be lacking, but hopefully it is clear enough. I went ahead and tried to imitate the painting with the dry summer grass and white carriage.

As mentioned above, there is little information in the way of dress for the postillon or coachman in Massena's service. For the postillion, I copied the appearance of the one in Napoleon's service. That may have been a bit presumptuous, but it is highly likely since the uniform is identical then the coloring of the uniform would be. The sculptor likely took some artistic license in the production of the piece also due to a lack of concrete information.

The painting earlier in this post showed some sort of coat of arms or seal upon the door to the carriage. Although I can imagine that is possible, I have no way to know if the painting is any more accurate than the sculpt. The image isn't clear enough to even discern what it is, let alone to recreate some approximation of the image. The sculpt did have what I first took to be a moulding line going down each side of the carriage.

Upon closer inspection, this appears to have a contour with the top and bottom shape of the carriage. Not knowing what to do with it and so badly wanting to add some dash of color or detail to an otherwise bland model, I painted a gold stripe atop this line. Such scrolling lines is not uncommon but it does make me wonder all the more just what image did the sculptor use for this piece?

Although I wish there were more detail and complexity to reflect a higher level of painting skill, this is the end result. Who knows if the coachman had red striped trousers and a beard or not, but mine does. The figure fits perfectly on the seat with his feet naturally being curved and positioned without any modification. I had the thought of making the seats in the coach a deep red to add color and contrast, but settled on a leather brown. Did Massena requisition this carriage or did it belong to him? In the end, there are more questions than answers, but at least it is finished.

Monday, October 2, 2017

AB Portuguese Line Infantry

The final battalion of Colonel Champalimaud's Third Brigade in Picton's 3rd Division.

Much simpler to paint up than British line. The first two battalions had flags from Cotton Jim's and I had always meant to upgrade to something nicer when the opportunity presented itself. The flags of Fighting 15's are to the correct scale and quality for the figures being used.

This will bring my Portuguese up to six line battalions and two cacadore battalions.

Happy to to be done with this division and am already in the progress of finishing up another division of British.

Sunday, September 17, 2017

The Bridge AAR

A battle that turned out to be smaller than I had originally expected. Everyone appeared to be busy this weekend and so a 1-on-1 game is what we settled on playing. So that the game would not drag on relentlessly and appear aimless, I setup the scenario for 10 turns each and to have control over the bridge as the objective for winning. Each side had pretty similar forces but some slight differences in artillery and cavalry. I hadn't finished my 3rd battalion of AB Portuguese, so my Old Glory units filled in the Portuguese brigade for the British 3rd Division.

Both sides cautiously move forward through the center. The natural tendency is to cling to the villages either side of the stream. Although the stream is fordable, it does restrict movement. The bridge is a natural bottleneck and no one really wants to be stuck crossing it in an unfortunate formation such as a column. In my mind, it makes a good objective because you cannot take it and hide within its confines the way you would a village, forest or on top of a hill.

The French (my side) right wing. Both sides had smartly placed their cavalry on the plains where they could maximize their movement advantage. The British light cavalry brigade can be seen at the top moving up to meet the French advance.

The Portuguese move up to secure their side of the stream. The British chose to place the artillery in the center to secure the objective through firepower. I placed my battery beside the village to help sweep the open area. Although I only had a single horse artillery battery, it did prove to be more useful as this position permitted me to get into action sooner than the British battery, which never managed to open fire.

As I tried to close in around the bridge, the British infantry took a deeper interest in my advance in the center and moved to apply pressure on my flank. This ultimately lead me to divert a few battalions to square off against them.

The French dragoons had charged in with the best of intentions but were pushed back. Although the dragoons had a slight numerical advantage, I was unable to really make great use of that due to available space. I did manage to go after the slightly easier target first, being the British light dragoons and saving the British hussars when I could gain an advantage over them.

The horse artillery didn't manage to soften the British line up much here and so the French line infantry are going to have to try and rely on some brute force to break it up. I had to be careful in advancing with the infantry as I was fully expecting the British cavalry to come charging out and force my troops to form square. They showed some uncharacteristic restraint in not charging the infantry, probably more concerned with the French dragoons.

The Anglo-Portuguese have managed to form around the bridge in a position that would permit them to have a crossfire with any of my French troops that look to seize the objective. A solid move.

I had to form into line to counter the firepower that the British troops here were able to deliver. In forming into line, my movement slowed down and when combined with the terrain, bogged my advance down. One battalion tried to advance in column and batter its way across, but the Portuguese didn't give way. It would take repeated attempts to make a crossing.

Part of 2eme Legere, having made its way through the olive rows, attempted to push the British position back. After a couple of exchanges of fire, the British infantry fired upon the French closing up. The left battalion has taken some serious disruptions that will handicap it in the upcoming melee.

A grand charge of the entire right wing. The French dragoons, having obtained a clear numerical advantage by breaking one of the British light dragoon regiments, now decide to proceed all out and perform a combined charge with the infantry. There isn't a qualitative advantage but there is a numerical advantage that the French have in their favor.

From another angle, part of the French dragoon brigade remains in reserve. The combat results turn out to be the loss of the British hussars and the 94th Foot breaks. The light dragoons would be in a horrible and isolated position were it not for the end of the scenario.

The 2nd Battalion of the 2eme Legere broke as the French charge here failed quite miserably. While the French manage to inflict slightly more casualties than they took and obtain a contested foothold on the other side of the stream, it wasn't convincing to declare a victory by the time constraints. The attack column failed to live up to its reputation and the Anglo-Portuguese infantry managed to stay solid and deliver enough fire power to weaken the French attacks. The British leftwing/French rightwing was more in the French's favor, but was not enough to decide the game. More damage would have been required to achieve victory through breaking the enemy force.

The end result was a draw.

Wednesday, August 16, 2017

AB Peninsula British Infantry

A while back I departed with my Eureka 15mm British infantry with Belgic shakos as a way of motivating me to finish this project. Although I am fond of the Belgic, it isn't entirely accurate for the Peninsular theater where I am focused. With work and life, progress was slow and putting on a game was going to be a challenge unless I wanted to unleash my Spanish to fight alone.

This is 2/3 of Picton's Third Division from 1810-1811. The Seven British battalions were accompanied with 3 Portuguese battalions. I hope to have the final Portuguese battalion completed soon.

I'm happy with how they came out and just wanted to update the blog with some more relevant content. After I complete this division, I have one more to get me to where I want to be.

I might also mention that I went with the at ease pose due to concerns with bayonets. Anyone familiar with the Eureka figures knows the metal is a bit softer and if you're going to have other gamers handling your figures, you had best do what you can to prevent broken bayonets. No such problem here. I also notice with the AB range that this pose has more variety including a few without shakos and in a fatigue cap and a few missing any hat at all. A little variety is good and can be fun to play around with.

Thursday, August 3, 2017

New Napoleonic Scenario Books


Finding good scenario books is a challenge as most are rule set specific and often won't translate well into other rule sets. Sometimes scenarios that are available are all too common and frequently too large for many gamers to get involved in. Napoleonic gamers know of Wagram, but not many are aware of the smaller battles leading up to the climatic battle itself.

The first two volumes of the 1809 Danube campaign are now ready for you to reserve. Two more scenario books for the 1809 Danube campaign will follow shortly. These volumes, produced by the venerable Michael Hopper, author of Rise of Eagles, is producing a line of scenario books with many smaller unknown scenarios. The first two are fairly extensive and represent years of work and play testing to work out a finished product that any Napoleonic gamer would want to add to a collection.

These scenario books will only be produced in a limited run, so if you choose to wait you will miss out. If you want to own a finely produced scenario book to expand your game playing or inspire you to run a unique scenario with a chance of completing an entire campaign, this is your chance. You may contact Michael Hopper at: log1cal.mh@gmail.com

Saturday, March 4, 2017

Battle of Guilford Courthouse March 15, 1784

It has been a while since I've posted, but I look forward to getting back on track. In February I was privileged to play in a refight of the historic Guilford Courthouse during the American War of Independence. Although not a large battle, it did contain a good number of units that would later take part in the Battle of Yorktown. Here we see Cornwallis' command entering the field.

The Americans have three lines of defense. The first two are made of militia units, with the first being untested militia who had orders to give two good shots and retire. The first line also had some small light infantry and cavalry units to harass the flanks of the British. The third line contains the Continental regiments, which are the best quality of troops Greene has.

The American plan is to delay the British and inflict as many casualties as possible. The cavalry and light infantry are to harass and fall back all the way up to Guilford Courthouse, should they survive.

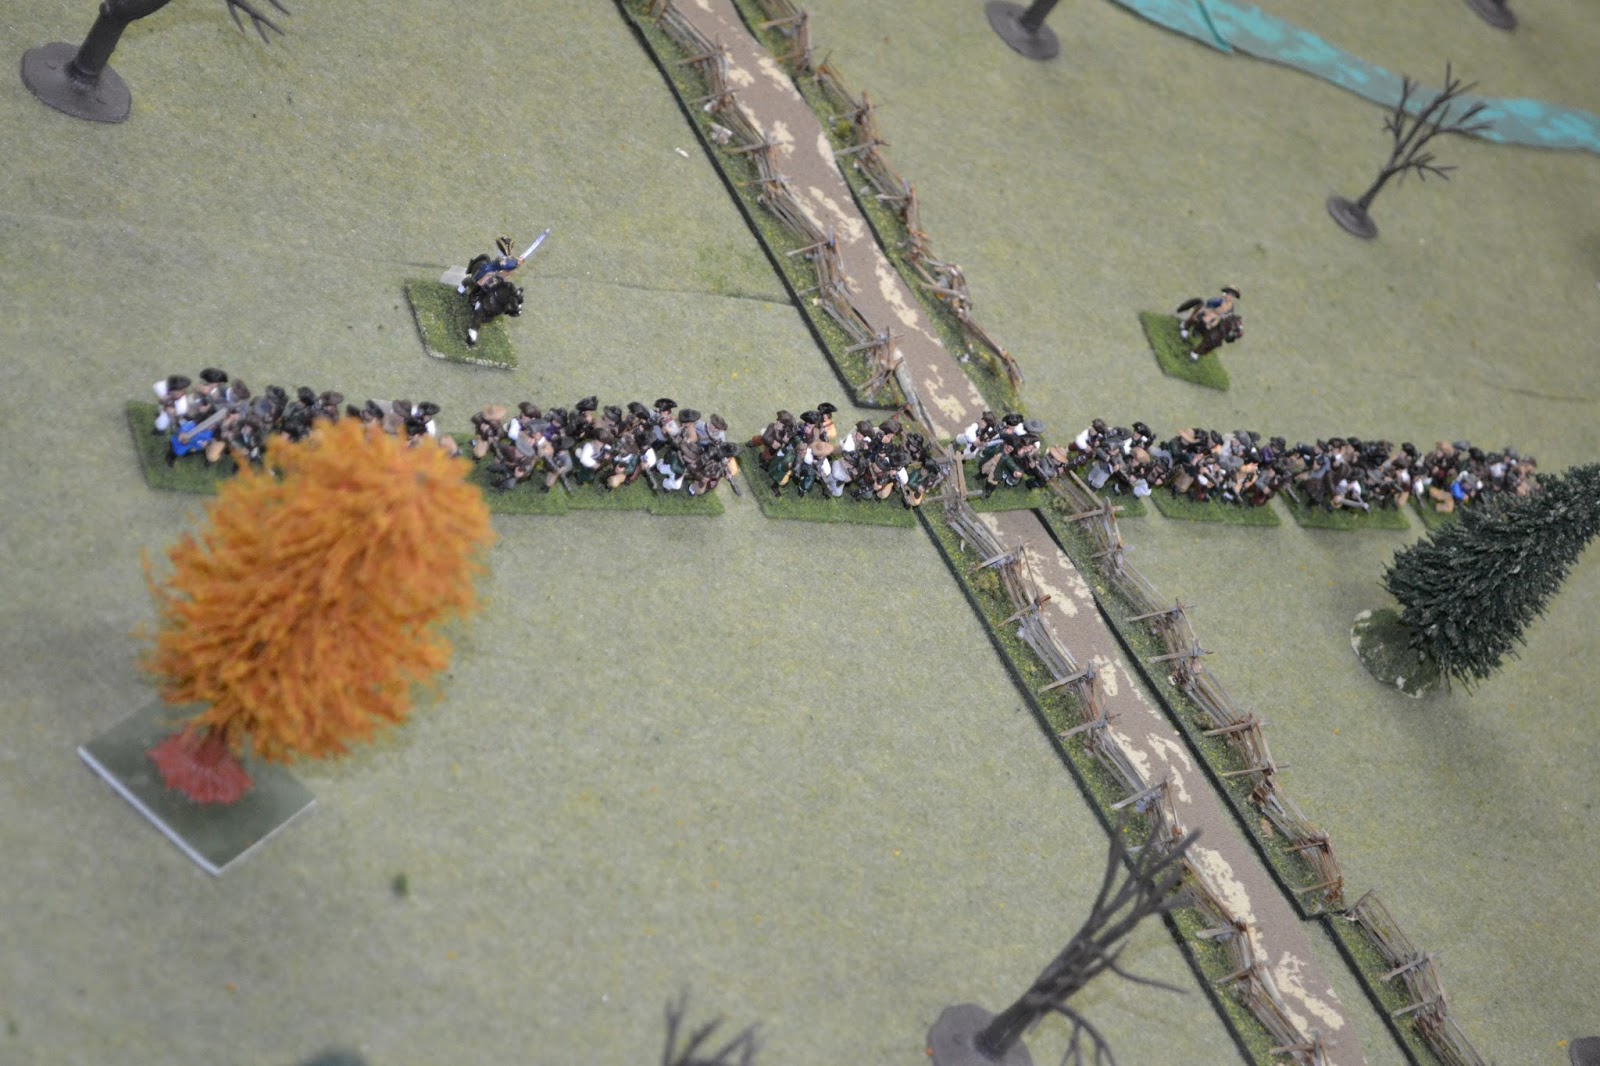
Here we have the first line of North Carolina militia units waiting behind the fence line. Lt. Colonel Washington's cavalry unit along with his light infantry. On the far side of the American line, you can see some of Light Horse Harry Lee's light infantry.

Here are the Virginia militia regiments in the second line. These militia were deemed a bit more reliable and in our refight, would prove to be a very difficult line to break.

The British advance after some cannon fire upon the militia. The British had hoped their cannon could clear the way, but it would take more than cannon to push the North Carolina militia units aside. Lt. Colonel Washington's light units are engaging the Hessian jaeger unit while Tarleton's cavalry enter the field (upper right).

Lee's light troops are tangling with the Hessians in an aggressive firefight that will wear down both sides. One of the North Carolina militia units had broke and left a gap due to continuous artillery fire. Cornwallis in this refight decided to use his cannons boldly, which managed to inflict minor damage.

With the Hessian jaegers eliminated early on, British Gen. Webster now has the problem of Lt. Colonel Washington's intact light infantry and dragoons on his flank. This threat to his flank would later prove to be a major problem as the British advance would be stalled.

Lee's light units fall back after some unsuccessful combat. Cornwallis' artillery continues to fire upon the North Carolina militia.

The British made an advance and the North Carolina militia were driven off. British General O'Hara's 2nd Guards and some converged Grenadiers then surged forward toward the Virginia militia manning the 2nd line.

Webster's troops have a dilemma before them. If they push on to attack the 2nd line, they will be shot at by rifled armed light troops and possibly hit in the rear by Washington's cavalry. The smaller light infantry units are faster than the British line regiments and can easily evade combat.

British General Leslie has decided to risk it and brave the harassment from Harry Lee's light troops. As you can see, the British attempting to move forward too quickly is leading to their units becoming disorganized as they are forced to fight effectively in different directions.

O'Hara and Webster's troops are attempting to destroy Lt. Colonel Washington's light troops that are managing to snipe at the British advance. The Virginia militia had managed to maul some of the British units before being broken. The casualty marker attest to the near breaking of multiple British units before they can even contact the fresh third line of defense.

Webster's regiments being continuously delayed fighting smaller numbers of American troops. The choice is either get shot in the back or turn and face your enemy.

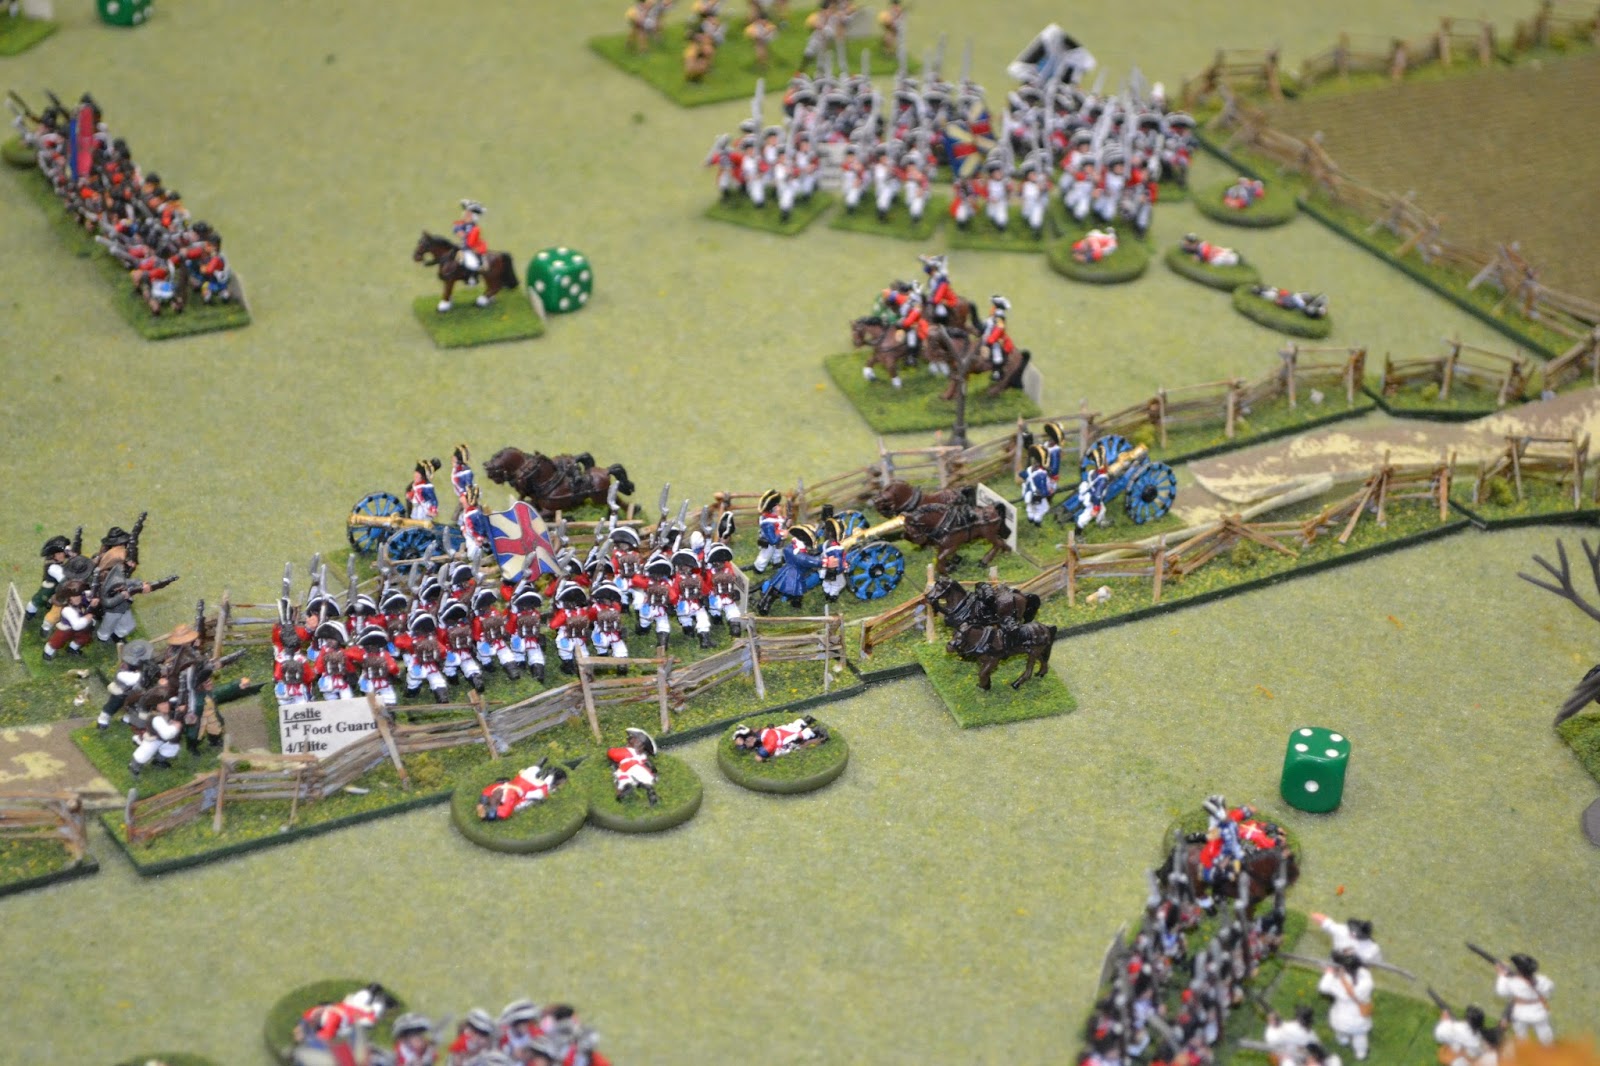
One of General Leslie's desperate attempts to protect the army's artillery with the battered 1st Foot Guards.

Webster's men finally broke from the fire of Lt. Colonel Washington's light troops (note the row of casualty markers). The converged grenadiers attempted and succeeded in destroying one of Washington's light infantry units. The overall exchange not being favorable to the British side.

A major attempt to push the attack on the final American line after dealing with Lee's troops and Virginia militia. As can be seen, the casualty markers mean these units are almost to the breaking point.

A rash British attempt to subdue the Continentals with the British artillery sections deploying before the Courthouse. Greene's Continentals can't resist and come down from the hill to try and take the guns.

The left of Green's 3rd line is cautiously sitting on the hill with the cannons, just in case the attack fails.

With Webster's command broken, O'Hara is forced back by the faster moving light troops of Lt. Colonel Washington. The grenadiers are close to their breaking point and so this was a smart idea.

After dealing with Cornwallis' artillery, the Hessians use the sacrificed artillery to advance up the road.

The Hessian unit makes a desperate charge into the American artillery, which fails to win the day.

On the right, all that remains of the British that began this battle. Time to retreat toward Yorktown?

A closer image of Cornwallis and the few units he has still upon the field. The Continental regiment pictured is also mauled from frontally engaging the British artillery.

Historically, it was a British victory, with the Americans being brushed aside. In this refight, the British had the misfortune of not dealing with the American light units effectively, which cost them the game. Not really pictured, were Tarleton's infamous cavalry. The reason they're not featured is because they suffered a major defeat that broke the unit very early in the game (didn't get a chance to picture that combat). The British cavalry could have been used to counter the American flanking actions had they not been used as a battering ram.